
Golden hour and blue hour photography offer stunning lighting conditions that can elevate your images. During golden hour, you’ll capture warm, soft light just after sunrise or before sunset, creating inviting and textured photos. Blue hour, happening before sunrise or after sunset, provides cool, tranquil tones perfect for calm and atmospheric shots. Understanding how to work with these unique light qualities will help you create more mesmerizing photos; there’s plenty more to discover ahead.
Key Takeaways
- Golden hour offers warm, diffused light ideal for enhancing textures, silhouettes, and capturing rich, inviting images.
- Blue hour provides cool, tranquil tones with longer exposures, perfect for atmospheric and serene photography.
- Adjust camera white balance to around 3000K-4000K during golden hour and 6000K-10000K during blue hour for optimal color effects.
- Use natural light creatively by shooting against the light during golden hour or embracing shadows during blue hour.
- Timing and understanding light interaction with the environment are essential for capturing mood and enhancing photographic impact.
Have you ever wondered why some photos seem to glow with warmth or shimmer with cool tones? The secret often lies in the lighting techniques and the changing color temperature of the natural light around you. During the golden hour and blue hour, the quality of light transforms, offering you extraordinary opportunities to capture stunning images. These periods are not only about the time of day but about how light interacts with the environment, creating moods and atmospheres that are hard to replicate at other times.
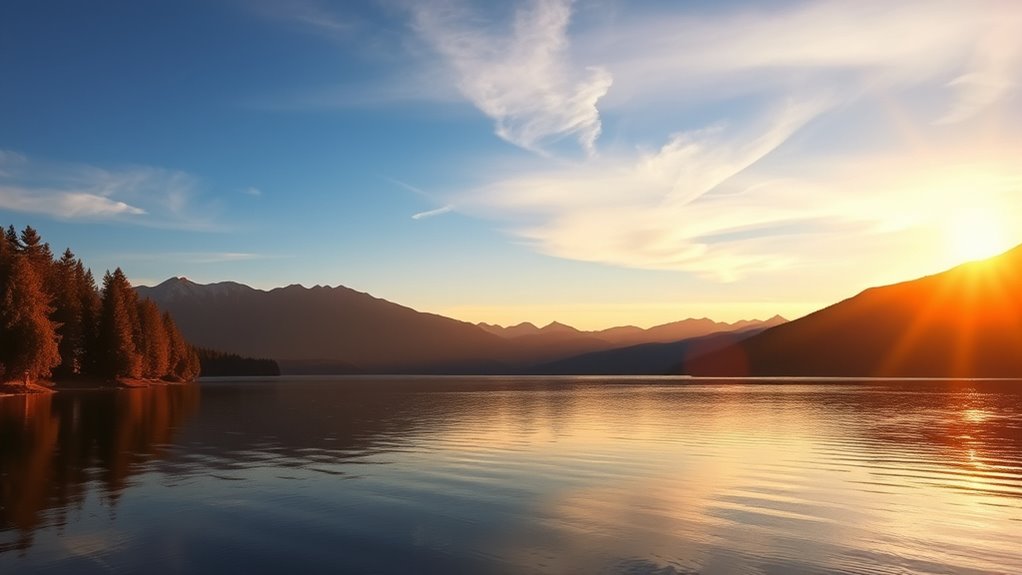
Golden hour, occurring shortly after sunrise and before sunset, is characterized by a warm, golden hue that bathing everything in a soft, flattering light. This warm glow results from the low angle of the sun, which produces longer shadows and a gentle, diffused light. When you’re shooting during this time, it’s essential to pay attention to lighting techniques that maximize the warmth and depth of the scene. Shooting towards the light can enhance the golden tones, creating silhouettes or emphasizing textures. Adjusting your camera’s white balance toward a warmer setting can also intensify the golden effect, ensuring the colors in your photos are rich and inviting. The key here is to harness the natural color temperature, which is lower during golden hour, typically around 3000K to 4000K, giving your images that signature warm glow. Additionally, understanding light quality and how it interacts with your camera settings can help you make the most of these fleeting moments.
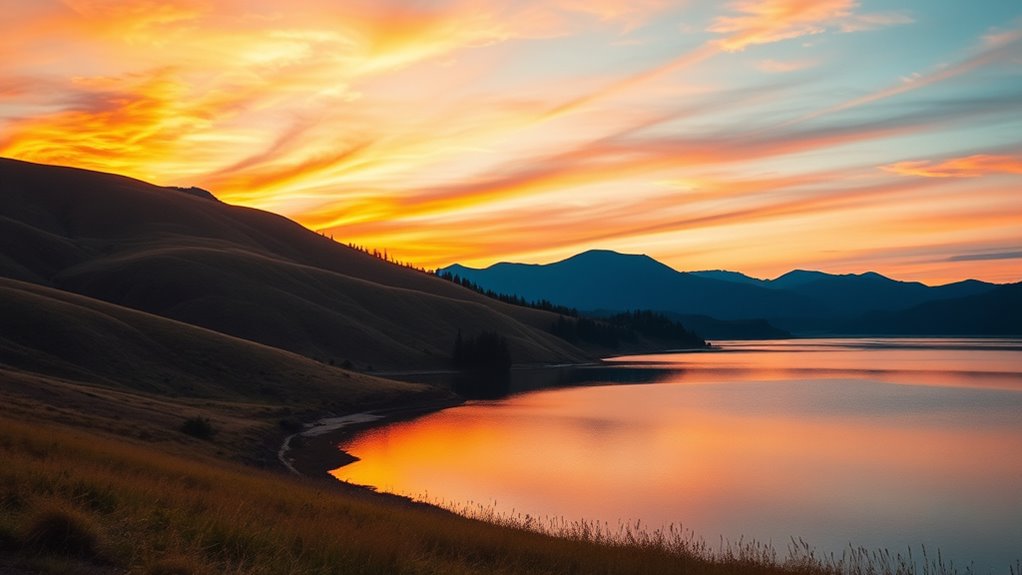
On the other hand, blue hour happens just before sunrise or after sunset when the sun is below the horizon, and the sky takes on a deep, cool blue tone. During this time, the light is more diffuse, with less direct sunlight, creating a calm and tranquil atmosphere. As a photographer, you want to embrace the cooler color temperature—often around 6000K to 10000K—and use it to your advantage. The lighting techniques during blue hour involve capturing the subtle interplay of shadows and highlights, often with longer exposures to gather more light and bring out the rich blues in the sky. Using a tripod becomes vital here because of the slower shutter speeds needed. The cool tones can evoke feelings of serenity and introspection, making your images stand out with their ethereal quality.
Understanding how to adapt your camera settings and techniques to these lighting conditions will elevate your photography. Whether you’re emphasizing the warm, golden hues of golden hour or the cool, tranquil shades of blue hour, being mindful of lighting techniques and color temperature helps you craft images that truly resonate. By consciously working with the natural light’s characteristics, you’ll find your photos not only capture the moment but also evoke the mood and atmosphere that make these times of day so special.

K&F CONCEPT 90''/230cm Ultra High Camera Tripod,Horizontal Overhead Shooting Flexible Travel Tripods with Metal Ball Head 10KG Load Capacity, Detachable Monopod, for Indoor and Outdoor T254A7+BH-28L
Unparalleled Versatility: Enjoy the freedom to capture shots from any angle with the patent gimbal, flexible legs offering…
As an affiliate, we earn on qualifying purchases.
As an affiliate, we earn on qualifying purchases.
Frequently Asked Questions
How Do Weather Conditions Affect Golden and Blue Hour Photography?
Weather conditions considerably impact your golden and blue hour photography by influencing atmospheric effects and light quality. Clear skies enhance warm, vibrant tones during golden hour, while clouds can soften and diffuse light, creating moodier images. During blue hour, overcast weather may dull colors, but mist or fog adds a dreamy atmosphere. Always consider weather impact to plan your shoot for ideal lighting and atmospheric effects, ensuring stunning photos.
What Camera Settings Are Ideal During These Lighting Periods?
Think of your camera as a painter’s brush, capturing the subtle hues of the sky. During these lighting periods, set your camera to a low ISO (100-400) to keep images crisp, and use a small aperture (f/8-f/16) for depth. Adjust your shutter speed to balance exposure, and consider using a tripod. These lighting adjustments help you harness the soft, warm glow or cool tones perfectly.
Can Smartphones Effectively Capture Golden and Blue Hour Images?
Smartphones can effectively capture golden and blue hour images, but their limitations, like sensor size and lens quality, can affect results. You should use manual controls if available, adjust exposure, and avoid digital zoom. Rely on your phone’s image processing to enhance low-light shots, but be aware it might introduce noise or overly processed results. With patience and proper techniques, your smartphone can produce stunning images during these beautiful lighting periods.
How Do I Plan for Golden and Blue Hour Shoots in Advance?
Timing precision is your secret weapon. To plan ahead, check sunrise and sunset times for your location, and use apps to track these periods accurately. Scout your locations beforehand, noting where the best lighting and compositions occur during golden and blue hours. Visualize your shots in advance, so when the moment arrives, you’re ready to capture the magic. Preparation transforms fleeting moments into timeless images.
Are There Specific Subjects or Compositions Best Suited for These Times?
You’ll find urban landscapes and portrait photography shine during these times. Use the warm, soft light to highlight cityscapes, capturing reflections or silhouettes for dramatic effects. For portraits, the gentle glow enhances skin tones and adds a natural glow. Compose shots with interesting architecture or natural framing to maximize the mood. These times are perfect for creating evocative images that benefit from the unique lighting qualities of golden and blue hours.

Walking Way Rose Glow Soft Filter 49MM – Coated Nostalgia Camera Lens Filter for Portraits & Golden Hour, Creates Subtle Pink Hues & Dreamy Soft Focus
Create a Soft Rose Glow Effect: The Walking Way rose glow soft filter is engineered with a premium…
As an affiliate, we earn on qualifying purchases.
As an affiliate, we earn on qualifying purchases.
Conclusion
Now that you’ve mastered golden and blue hour photography, you’re about to open the secret portals to surreal, dreamlike images that can make even the most ordinary scenes look like masterpieces. Imagine capturing sunlight so golden it feels like you’re holding a piece of the sun itself, or blue hour so enchanting it drapes your photos in a mystical glow. With these skills, your photos will transcend reality, turning everyday moments into breathtaking masterpieces that leave everyone in awe.
Anwenk Grey White Balance Card 18% Exposure Photography Custom Calibration Camera Checker for DSLR and Film
Neutral 18% Grey / Gray Card with matte finish for scratch resistant. Non reflective and waterproof.
As an affiliate, we earn on qualifying purchases.
As an affiliate, we earn on qualifying purchases.

Mastering Lighting & Flash Photography: A Definitive Guide for Photographers
As an affiliate, we earn on qualifying purchases.
As an affiliate, we earn on qualifying purchases.