
To build a simple colorimeter with Arduino and LEDs, select LEDs that match the colors or absorption spectra you’re studying, then position them consistently around your sample to guarantee reliable measurements. Connect light sensors like photodiodes or LDRs to detect transmitted or reflected light, and calibrate your system using known standards for accuracy. Make sure your setup is light-tight and aligned properly for best results. Keep exploring more details to create an effective, low-cost color analysis device.
Key Takeaways
- Select LEDs with wavelengths matching the target colors or absorbance spectra for accurate measurements.
- Use a light-tight enclosure and position LEDs consistently to ensure uniform illumination and reliable readings.
- Incorporate photodiodes or LDRs connected to Arduino to detect transmitted or reflected light from samples.
- Perform calibration with known standards to correct system inaccuracies and establish baseline measurements.
- Program Arduino to process sensor data, calculate absorbance or transmittance, and display or log results effectively.
Building a colorimeter with Arduino and LEDs offers an accessible way to analyze the color properties of various samples. This DIY project enables you to measure how much light a sample absorbs or transmits at specific wavelengths, providing insight into its color composition. To get accurate results, proper spectrophotometry calibration is essential. Calibration helps correct for any system inaccuracies, ensuring your measurements are reliable. You’ll need to establish a baseline using a white standard or a known reference, which allows you to adjust your readings for consistent, precise data. Regular calibration checks can help maintain accuracy over time, especially if you plan to perform multiple measurements or experiments.
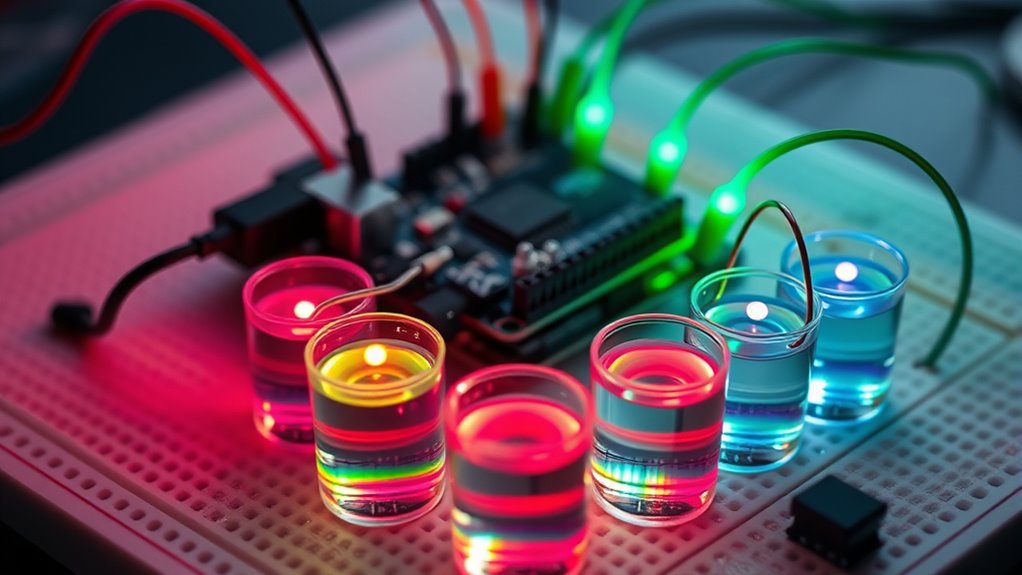
Selecting the right LED wavelength is a critical step in building your colorimeter. LEDs come in a variety of wavelengths, and choosing the appropriate ones depends on the specific colors or absorbance spectra you’re interested in analyzing. For example, if you’re measuring pigments that absorb in the blue region, you’ll want to include LEDs with wavelengths around 450 nm. Using LEDs with distinct, narrow spectra helps improve measurement precision because it reduces overlap between different wavelengths. When selecting LEDs, consider their spectral output, intensity, and stability. Higher intensity LEDs can improve signal-to-noise ratio, but they should also be compatible with your Arduino’s power capabilities to prevent damage.
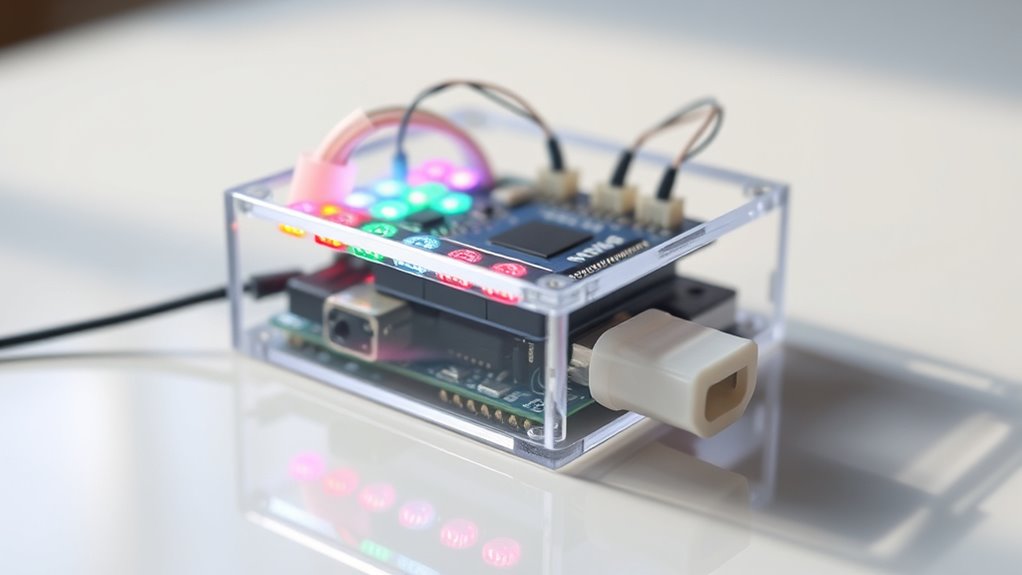
Aligning the LEDs properly with your sample is another key aspect. You want to ensure that the light passes through the sample and reaches the photodetector without excessive scattering or loss. Position your LEDs at consistent angles and distances from the sample to maintain measurement consistency. Using a light-tight enclosure can prevent ambient light interference, which can skew your readings. Additionally, incorporating a photodiode or a light-dependent resistor (LDR) as your sensor allows you to detect transmitted or reflected light accurately. Connect this sensor to your Arduino, and program it to read analog values corresponding to light intensity. These readings, combined with your calibration data, will give you the absorbance or transmittance of your samples.
Remember that the entire system’s accuracy hinges on careful calibration and thoughtful LED wavelength selection. By choosing LEDs that match the spectral regions of interest and calibrating your device with known standards, you’ll ensure your measurements are both precise and meaningful. Incorporating accurate calibration methods can significantly enhance the reliability of your results, making your DIY colorimeter a valuable tool for experiments and color analysis. This straightforward approach makes building a functional, cost-effective colorimeter feasible for hobbyists, students, or researchers looking to explore color analysis without investing in expensive commercial spectrophotometers.
ELEGOO Mega R3 Project The Most Complete Ultimate Starter Kit with Tutorial Compatible with Arduino IDE
The MEGA2560 complete starter kit with more than 200pcs components, premium quality for Arduino kit
As an affiliate, we earn on qualifying purchases.
As an affiliate, we earn on qualifying purchases.
Frequently Asked Questions
What Types of Samples Can I Test With This Colorimeter?
You can test a variety of sample types with your colorimeter, including liquids like beverages, chemicals, and biological samples, as well as solids such as pigments, powders, or food products. To guarantee accurate readings, use proper calibration techniques like zero calibration with a blank sample and standard calibration with known reference samples. This helps you measure color changes precisely across different sample types, making your device versatile for many applications.
How Accurate Is the Color Measurement Compared to Professional Devices?
Your color measurement accuracy depends on calibration techniques you use. While DIY colorimeters can be quite precise with proper calibration, they generally don’t match professional devices‘ accuracy. Factors like LED consistency and sensor quality influence results. You can improve measurement accuracy by regularly calibrating your device against known standards and ensuring consistent lighting conditions. Though not as exact as commercial instruments, your setup offers reliable, cost-effective results for many applications.
Can This Setup Be Integrated With a Smartphone App?
Yes, you can integrate this setup with a smartphone app through Bluetooth or Wi-Fi modules. You’ll need to develop an app that communicates with your Arduino via Bluetooth or Wi-Fi, enabling real-time data transfer, display, and analysis. With thoughtful app development, you’ll enhance your colorimeter’s usability, making it more accessible and versatile. This integration transforms your device into a portable, user-friendly tool for accurate color measurement on the go.
What Are Common Troubleshooting Steps for Inconsistent Readings?
To troubleshoot inconsistent readings, first check your sensor calibration to guarantee accuracy. Make sure your power supply is stable and provides consistent voltage, as fluctuations can affect sensor performance. Clean the sensor and LED surfaces to prevent dirt interference. Verify connections are secure, and test with known color samples. Updating the Arduino code for proper data processing also helps maintain reliable, consistent readings.
How Can I Calibrate the Colorimeter for Different Lighting Conditions?
You might worry calibration is complicated, but it’s straightforward. First, perform lighting calibration by using a standard white tile in your current lighting conditions. Then, adjust for ambient lighting by taking baseline readings with the environment’s lighting and subtracting these from your sample measurements. This guarantees your colorimeter accounts for ambient adjustment, giving you accurate, consistent readings across different lighting conditions.

California JOS 50 PCS Colorful 5mm LED Light Diodes, LED Circuit Assorted Kit for Science Project Experiment (10pieces/Color)
✅Multi-color: 5 Colors – White/Red/Green/Blue/Yellow, 5 mm LED Diodes Kit with water drop shape round.
As an affiliate, we earn on qualifying purchases.
As an affiliate, we earn on qualifying purchases.
Conclusion
Building a colorimeter with Arduino and LEDs is a simple, effective way to measure colors accurately. Did you know that LED-based colorimeters can detect subtle color differences as small as 1 nanometer? This project not only enhances your understanding of light and color but also offers a practical tool for various applications. By experimenting with this setup, you gain valuable skills in electronics and programming, opening doors to more advanced sensing projects in the future.

EC Buying Photodiode Sensor Module, 4 Pins Photodiode Sensor Module, 5mm Photodiode Module, for Digital Light Brightness Detection, Photosensitive Sensor Module for Arduino(10PCS)
Photodiode sensor module: light brightness detection, light brightness sensor, with directionality, only senses the light source directly in…
As an affiliate, we earn on qualifying purchases.
As an affiliate, we earn on qualifying purchases.

HiLetgo 100pcs 5528 Light Dependent Resistor LDR 5MM Photoresistor Photoconductive Resistance for Arduino
100pcs 5528 Light Dependent Resistor
As an affiliate, we earn on qualifying purchases.
As an affiliate, we earn on qualifying purchases.