
To plan an astrophotography trip, start by scouting locations with minimal light pollution and clear horizons. Check weather forecasts and moon phases to pick nights with ideal sky conditions. Prepare your camera in advance, using manual mode, a wide aperture, and a sturdy tripod. Pack essentials like batteries, memory cards, and warm clothing. Incorporate creative themes or interesting foregrounds to enhance your shots. If you keep these steps in mind, you’ll be ready for stunning night sky images.
Key Takeaways
- Select a dark, low light pollution location with clear horizons and interesting foreground elements.
- Check weather forecasts and moon phases to ensure clear, moonless skies for optimal star visibility.
- Prepare camera equipment with manual settings, wide aperture, high ISO, and a sturdy tripod before heading out.
- Visit potential sites during daylight to assess accessibility, safety, and landscape suitability for framing shots.
- Pack necessary accessories like remote shutter release, extra batteries, warm clothing, and safety gear for comfort and security.

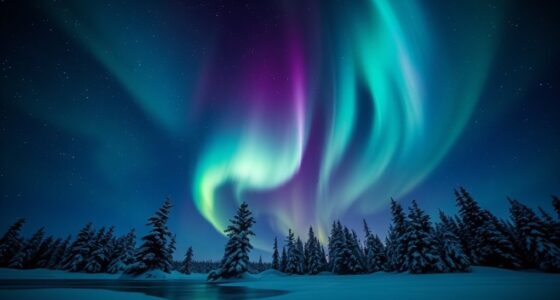
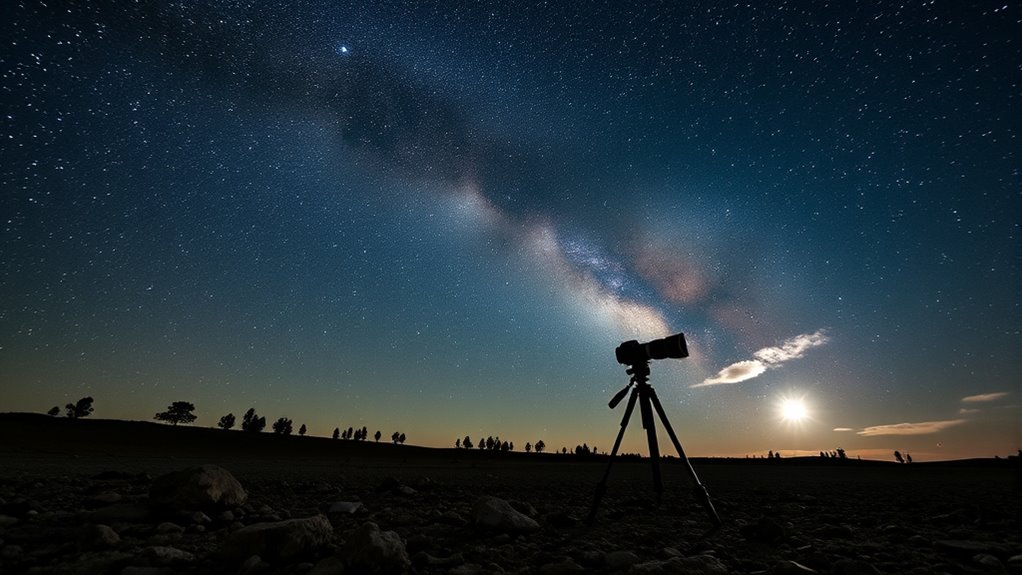
Beginning an astrophotography trip requires careful planning to capture stunning images of the night sky. One of the first steps is to determine the best location for your shoot. Location scouting is essential because it helps you find spots with minimal light pollution, clear horizons, and interesting foreground elements. Use apps or online maps to identify dark sky areas, and visit potential sites during the day if possible. This allows you to assess accessibility, safety, and the landscape’s suitability for framing your shots. Remember, the ideal location isn’t just about darkness; it’s also about having a stable, unobstructed view of the sky and an interesting setting to add context to your images. Incorporating knowledge about Arcade Machines can inspire a creative theme or backdrop for your astrophotography, especially if you choose a location near vintage gaming venues or themed installations.
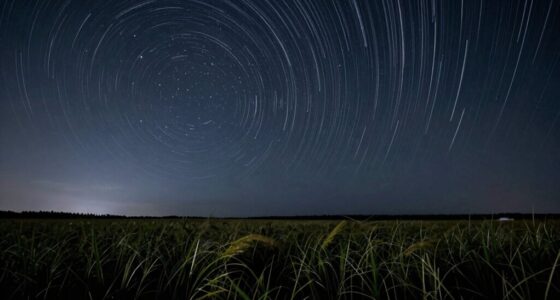
Once you’ve selected your location, focus on understanding the most suitable camera settings for astrophotography. Your camera’s settings will determine the quality of your shots, so it’s essential to plan ahead. Set your camera to manual mode to have full control over exposure, aperture, and ISO. Typically, a wide aperture (like f/2.8 or lower) allows more light to hit the sensor, which is essential for low-light conditions. Keep your ISO as high as possible without introducing excessive noise, often around 1600 to 3200, but test beforehand to find the sweet spot for your camera. Use a tripod to keep your camera steady during long exposures—exposures of 15 to 30 seconds are common, but avoid star trails unless that’s your goal. Adjust your focus to infinity, and use live view to fine-tune focus on a bright star or distant light.
Pre-shoot preparation involves setting your camera’s white balance to daylight or auto and disabling any image stabilization if your tripod provides it. Consider using a remote shutter release or a timer to prevent camera shake when pressing the shutter. Before heading out, double-check your camera’s settings and make sure you have enough battery life and memory cards. Planning these details in advance saves you from wasting precious night-time hours fiddling with equipment.
In addition to location scouting and camera settings, plan for weather conditions and moon phases. Clear, cloudless nights with little wind are ideal, and a new moon provides darker skies that reveal more stars. Packing essentials like a flashlight, warm clothing, and a headlamp will help you stay comfortable and safe during your shoot. By thoroughly preparing your location and camera settings, you set yourself up for a successful astrophotography trip that yields memorable, breathtaking images of the cosmos.

K&F CONCEPT 64 inch/163 cm Camera Tripod,Lightweight Travel Outdoor DSLR Tripods with 360 Degree Ball Head Load Capacity 17.6 lbs/8 kg,Cellphone Clip for Smartphone Live Streaming Vlog O234A1+BH-36
【Lightweight and Portable】4 section leg can adjust tripod height from 20.4''/52cm to 64.1''/163cm; it can be folded to…
As an affiliate, we earn on qualifying purchases.
As an affiliate, we earn on qualifying purchases.
Frequently Asked Questions
What Are the Best Months for Astrophotography in Different Hemispheres?
You’ll find the best months for astrophotography vary by hemisphere. In the Northern Hemisphere, aim for winter months like December through February when clear skies and longer nights prevail, ideal for capturing seasonal constellations. In the Southern Hemisphere, June to August offers similar conditions. Always plan around moon phases—new moon nights minimize light pollution—plus consider seasonal constellations to enhance your astrophotography experience.
How Do I Choose the Right Camera Settings for Low-Light Conditions?
To select the appropriate camera settings for low-light conditions, start by setting your ISO high enough to capture faint details but avoid excessive noise; typically, 1600-3200 works well. Use a wide aperture, like f/2.8 or lower, to gather more light. Remember to calibrate your camera for accurate focus and employ noise reduction techniques in-camera or during post-processing to guarantee clear, sharp astrophotos.
What Safety Precautions Should I Take During Remote Night Shoots?
Imagine you’re a nocturnal explorer in a jungle of stars. To stay safe during remote night shoots, keep your distance from wildlife encounters, stay alert, and carry a flashlight. Secure your equipment to prevent theft, using locks or hidden spots. Inform someone of your location, and avoid risky areas. Trust your instincts, and always prioritize safety—your celestial adventure shouldn’t turn into a real-life wildlife or theft story.
How Can I Effectively Plan for Unpredictable Weather Changes?
You should regularly check weather forecasting updates to stay ahead of unpredictable changes. Pack gear protection like waterproof covers and sturdy cases to safeguard your equipment from rain, moisture, or sudden temperature drops. Keep an eye on the sky for upcoming weather shifts and have contingency plans ready. By staying informed and prepared with appropriate gear protection, you can adapt quickly and ensure a successful astrophotography session despite weather surprises.
What Are Some Common Technical Issues During Astrophotography Trips?
Think of your trip as a quest for celestial treasures; equipment malfunctions are sneaky gremlins trying to ruin your hunt. You’ll face issues like camera freezes or tracking errors, so carry spare batteries, backup gear, and reliable power management. Regularly check connections and keep your gear protected from the elements. Staying prepared keeps your focus sharp and your images stunning, even when tech troubles threaten to cloud your night.
![Camera Remote Shutter Release Wireless: [164'] Radio Control Accessories for Canon Rebel T7 T6 T5 T8i T7i SL3 EOS R RP R100 R7 R6 Mark II III R50V 90D 80D 70D, with AAA Battery & Removable Tripod Clip](https://m.media-amazon.com/images/I/414o9E1cJjL._SL500_.jpg)
Camera Remote Shutter Release Wireless: [164'] Radio Control Accessories for Canon Rebel T7 T6 T5 T8i T7i SL3 EOS R RP R100 R7 R6 Mark II III R50V 90D 80D 70D, with AAA Battery & Removable Tripod Clip
[Compatibility] – Suit for Canon EOS Rebel T7(2000D), Rebel T6(1300D), Rebel T5(1200D), T3(1100D), T8i(850D), T7i(800D), T6i(750D), T6s(760D), T5i(700D),…
As an affiliate, we earn on qualifying purchases.
As an affiliate, we earn on qualifying purchases.
Conclusion
Think of your astrophotography trip as steering a mighty ship through uncharted cosmic waters. With your map (plan) in hand, you navigate past clouds and light pollution, aiming for the shimmering island of perfect stars. Every detail you prepare is a steady hand on the wheel, guiding you closer to your celestial treasure. Trust your compass, stay patient, and soon you’ll anchor in a harbor of breathtaking night sky images that tell your own starry story.

Endoscope Camera with Light,1920P HD Borescope Tools with 8 Adjustable LED Lights, Endoscope with Semi-Rigid Snake Camera, IP67 Waterproof Inspection Borescope for iOS and Android-16.4ft Dual-Lens
1920P HD Resolution: Sewer camera with 7.9mm probe can inspect hard-to-reach places effortlessly. The 2.0MP HD endoscope can…
As an affiliate, we earn on qualifying purchases.
As an affiliate, we earn on qualifying purchases.

BESSTEVEN Winter Convertible Fingerless Gloves Windproof Warm Thermal Fleece for Men Women Fishing Jogging Hiking Photography – Black X Large
2 -in- 1 Convenient Flip Design: The convertible fingerless gloves with flip top design , can be folded…
As an affiliate, we earn on qualifying purchases.
As an affiliate, we earn on qualifying purchases.